
Do you ever look at your clothes and think, "These could use a little something extra?" Maybe you have a favorite dark shirt that just feels a bit plain. Well, there is a really cool way to give those items a fresh, new life. We are talking about making awesome bleach tie dye patterns. It is a creative process that lets you turn ordinary fabric into something quite special, very much your own, and quite eye-catching.
This technique uses a common household item, a chemical product known as bleach, to remove color from fabric. As My text mentions, bleach is a generic name for chemicals used to take color out of things or to make them white. This is exactly what we do here. Instead of adding color, we are taking it away in cool designs, making light patterns on darker materials. It is, in a way, like drawing with light.
So, if you are looking for a fun, hands-on activity that results in truly unique clothing, this might be just what you need. It is a bit like how the anime Bleach, with its unforgettable characters and rich storytelling, leaves a lasting impact; your bleach tie dye creations can leave a lasting impression too. Let's explore how you can start making your own amazing bleach tie dye patterns today.
Table of Contents
Understanding Bleach Tie Dye
Gathering Your Supplies
Safety First: Important Tips
Preparing Your Fabric for Bleach Tie Dye
Popular Bleach Tie Dye Patterns to Try
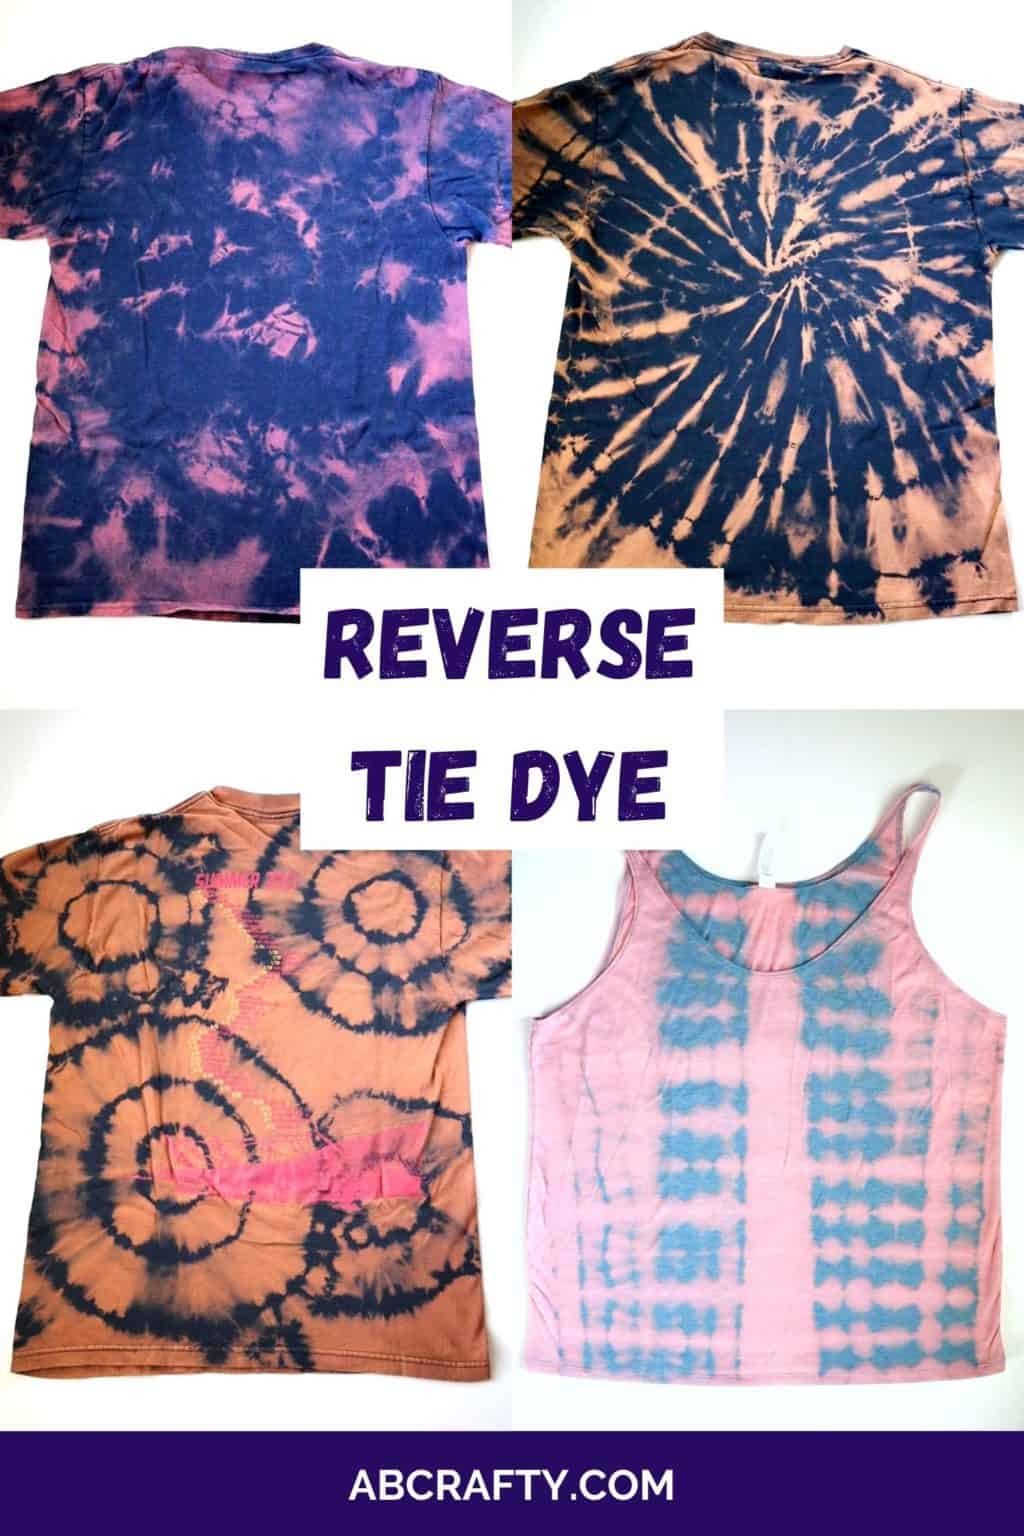
The Classic Swirl
Stripes and Lines
Crumple or Scrunch Pattern
Target or Bullseye Design
Heart Shape
The Bleaching Process: Step-by-Step
Washing and Caring for Your Bleach Tie Dye Creations
Frequently Asked Questions About Bleach Tie Dye
Your Next Steps in DIY Fashion
Understanding Bleach Tie Dye
Bleach tie dye, sometimes called reverse tie dye, is a neat way to change the color of fabric. Instead of adding bright dyes, you use bleach to take color away. This creates lighter designs on a darker background. It works best on clothes that are dark, like black, navy, or deep reds. The bleach reacts with the dye in the fabric, removing it and revealing the fabric's natural, lighter color underneath, or sometimes even a different shade like orange or pink, depending on the original dye.
This method is popular for making old clothes feel new again. It is also a very budget-friendly craft. You can use items you already own, which is a nice bonus. Plus, every single piece you make will be one of a kind. You really cannot make two identical items, which is pretty cool.
Gathering Your Supplies
Before you begin, you will need to get a few things ready. Having everything at hand makes the process smoother, you know? It just helps things flow better.
- Bleach: Regular household bleach works well. You might want to get a fresh bottle.
- Dark-colored fabric items: T-shirts, hoodies, sweatpants, or even tote bags are great choices. Cotton fabrics tend to give the best results.
- Spray bottle or squeeze bottles: These help you control where the bleach goes. A spray bottle is good for a mist, and squeeze bottles are nice for lines.
- Rubber bands or string: For tying up your fabric to create patterns.
- Rubber gloves: This is very important for protecting your hands from the bleach.
- Bucket or plastic bin: For rinsing your items and for containing the bleach solution.
- Old clothes or an apron: Bleach can splash, so wear something you do not mind getting marked.
- Plastic sheeting or old towels: To protect your work surface.
- Access to a well-ventilated area: Bleach fumes can be strong, so working outside or in a very open room is smart.
- Water: For diluting bleach and rinsing.
- Neutralizer (optional but recommended): Hydrogen peroxide or a commercial bleach stop product. This helps stop the bleaching action.
Safety First: Important Tips
Working with bleach means taking some precautions. It is a strong chemical, after all, so being careful is really important. Your safety comes first, you know?
- Wear gloves: Always, always wear rubber gloves to protect your skin. Bleach can cause irritation or burns.
- Work in a well-aired space: Open windows, or better yet, go outside. The fumes can be strong and bother your lungs.
- Protect your eyes: Safety glasses are a good idea, especially if you are using a spray bottle.
- Wear old clothes: Bleach will lighten any fabric it touches. Do not wear your favorite outfit!
- Keep pets and children away: This is not a project for little ones or curious animals. Keep them safe.
- Do not mix bleach with other cleaners: This is very, very important. Mixing bleach with things like ammonia can create dangerous gases. Only use it with water.
- Have water nearby: If bleach gets on your skin, rinse it right away with plenty of water.
Preparing Your Fabric for Bleach Tie Dye
Getting your fabric ready is a key step for good results. A clean surface helps the bleach work its magic evenly, you know? It really does make a difference.
First, wash your chosen garment. This removes any sizing or dirt that might prevent the bleach from soaking in properly. Do not use fabric softener, as that can also create a barrier. Just a simple wash and dry will do the trick.
Once your item is clean and dry, you are ready to start folding or tying it. This is where the creativity begins. The way you fold and tie will decide what kind of pattern appears. There are so many ways to do this, so you can really play around with it.
Popular Bleach Tie Dye Patterns to Try
There are many ways to fold and tie your fabric to get different looks. Here are some popular bleach tie dye patterns that are fun to try. Each one gives a unique outcome, which is pretty cool.
The Classic Swirl
This is probably the most recognized tie dye pattern, and it works great with bleach too. It makes a cool spiral design. To do this, lay your damp fabric flat. Pinch the fabric in the middle and start twisting it clockwise or counter-clockwise. Keep twisting until the whole item is a tight, flat spiral. Secure it with several rubber bands, making sure they cross over the center, dividing the circle into sections. This is a very popular one, you know?
Stripes and Lines
For stripes, lay your fabric flat and fold it like an accordion. Make even folds, going back and forth. The width of your folds will determine the width of your stripes. Once folded, use rubber bands to secure sections along the length of the folded fabric. Where the rubber bands are, the bleach will have less access, creating distinct lines. You can make vertical or horizontal stripes, depending on how you fold it. It is a pretty straightforward method.
Crumple or Scrunch Pattern
This pattern is super easy and gives a really organic, random look. Simply lay your fabric flat and then just scrunch it up into a tight ball. The more compact you make it, the more defined the unbleached areas will be. Once it is a tight ball, secure it with several rubber bands wrapped around it in different directions. This is great for beginners, as there is no wrong way to do it. It is almost like making a cloud pattern, you know?
Target or Bullseye Design
To make a target, pinch the fabric where you want the center of your target to be. Pull that point up. Then, gather the fabric around that point, creating a tube shape. Place rubber bands at regular intervals down the length of the tube. Each rubber band will create a ring in your bullseye design. The closer the bands, the more rings you will get. This one is quite striking, you see?
Heart Shape
Making a heart shape is a little more involved but very rewarding. Lay your fabric flat and fold it in half lengthwise. Draw half a heart shape along the folded edge with a washable marker. Now, accordion-fold the fabric along that half-heart line. Once folded, secure it tightly with rubber bands around the shape. When you open it up, you should have a heart. It takes a bit more care, but it is really charming.
The Bleaching Process: Step-by-Step
Now comes the exciting part: applying the bleach! Remember to work in a well-ventilated area and wear your gloves. This is where the magic happens, so to speak.
- Prepare your bleach solution: For most fabrics, a 50/50 mix of bleach and water works well. For a more subtle effect or delicate fabrics, you might try a 1:2 or 1:3 ratio (one part bleach to two or three parts water). Put your chosen solution into a spray bottle or squeeze bottle.
- Place your tied fabric: Lay your tied-up fabric on your protected work surface. Make sure it is flat and stable.
- Apply the bleach:
- For spray bottles: Lightly mist the areas you want to bleach. You can spray more for a stronger effect.
- For squeeze bottles: Drizzle the bleach solution onto the fabric, targeting specific areas or lines.
- For a dipped look: You can also dip parts of your tied fabric into a bucket of bleach solution for a few seconds.
- Watch for color change: The fabric will start to change color almost immediately. The time it takes depends on the fabric, the original dye, and the strength of your bleach solution. It could be anywhere from 5 to 20 minutes. Keep a close eye on it. You want to stop the process when you like the color, not when it is completely white, unless that is your goal.
- Rinse thoroughly: Once you are happy with the color change, immediately rinse the item under cold running water. Keep rinsing until the water runs clear and you cannot smell bleach anymore. This stops the bleaching action.
- Neutralize (optional but recommended): After rinsing, you can soak the item in a solution of water and a few tablespoons of hydrogen peroxide for about 10 minutes. This helps neutralize any remaining bleach, which can prevent the fabric from degrading over time. Then, rinse again.
- Remove rubber bands and wash: Take off all the rubber bands. Then, wash the item by itself in a washing machine with a little bit of detergent. Use cold water. This helps get rid of any lingering bleach and reveals your full design.
- Dry: Dry your item as usual. Now you have a unique piece of clothing!
Washing and Caring for Your Bleach Tie Dye Creations
Once your amazing bleach tie dye patterns are complete, you will want to care for them properly. This helps keep them looking good for a long time. It is pretty simple, actually.
For the first few washes, wash your new bleach tie dye item by itself or with similar dark colors. This prevents any residual bleach from affecting other garments. Use cold water and a gentle cycle. You can use your regular laundry detergent. After the first few washes, it should be fine to wash with your other dark clothes. Just try to avoid washing it with very light-colored items, just in case. Drying can be done in a machine on a low setting or by air drying. Air drying is often gentler on fabrics, so that is always a good choice, too.
Frequently Asked Questions About Bleach Tie Dye
People often have questions when they are starting out with bleach tie dye. Here are some common ones that come up, you know?
What kind of fabric works best for bleach tie dye patterns?
Natural fibers like cotton work really well because they react strongly with bleach. Synthetic fabrics, like polyester, often do not hold dye in the same way, so the bleach might not have much effect on them. Dark colors are always best for seeing the patterns clearly.
Can I use colored bleach for tie dye?
No, you should stick to regular, plain household bleach. Colored bleach products often have additives that can mess with the bleaching process or leave unexpected stains. You really want the standard stuff for this kind of project.
How do I make sure the bleach does not ruin my clothes?
The key is to watch it closely and rinse quickly. Do not leave the bleach on for too long, as it can weaken the fabric. Using a diluted solution helps too. If you are worried, try a test spot on an old piece of similar fabric first. That is a smart move, you see?
Your Next Steps in DIY Fashion
Creating bleach tie dye patterns is a really rewarding activity. It lets you take something ordinary and make it truly extraordinary. Every piece you create will tell its own story, with unique swirls, lines, or crumbles. It is a fantastic way to express your personal style and give old items a new lease on life. So, gather your supplies, pick a favorite old shirt, and start experimenting with different folds and techniques. You might be surprised at what amazing designs you can make. Check out more DIY fashion ideas on our site for even more inspiration.


Detail Author:
- Name : Mr. Lowell Reinger
- Username : glover.keven
- Email : thurman41@hotmail.com
- Birthdate : 1991-12-24
- Address : 3865 Altenwerth Turnpike Suite 311 Winnifredburgh, NC 70217-3236
- Phone : +1-530-325-2965
- Company : Corwin, Waelchi and Ferry
- Job : Welder
- Bio : Et consequatur ipsa ut quia ipsa dolor vel. Quas suscipit nam atque vel placeat nulla. Modi velit eligendi consequatur nam. Et rerum ipsa ut velit sint illum maxime.
Socials
instagram:
- url : https://instagram.com/esther.yost
- username : esther.yost
- bio : Omnis tenetur id voluptas cupiditate ea. Doloribus sit odit error quis possimus.
- followers : 2292
- following : 1589
tiktok:
- url : https://tiktok.com/@yoste
- username : yoste
- bio : Suscipit libero nulla est non. Ad est vitae at vel quaerat praesentium dolores.
- followers : 2541
- following : 1093
