
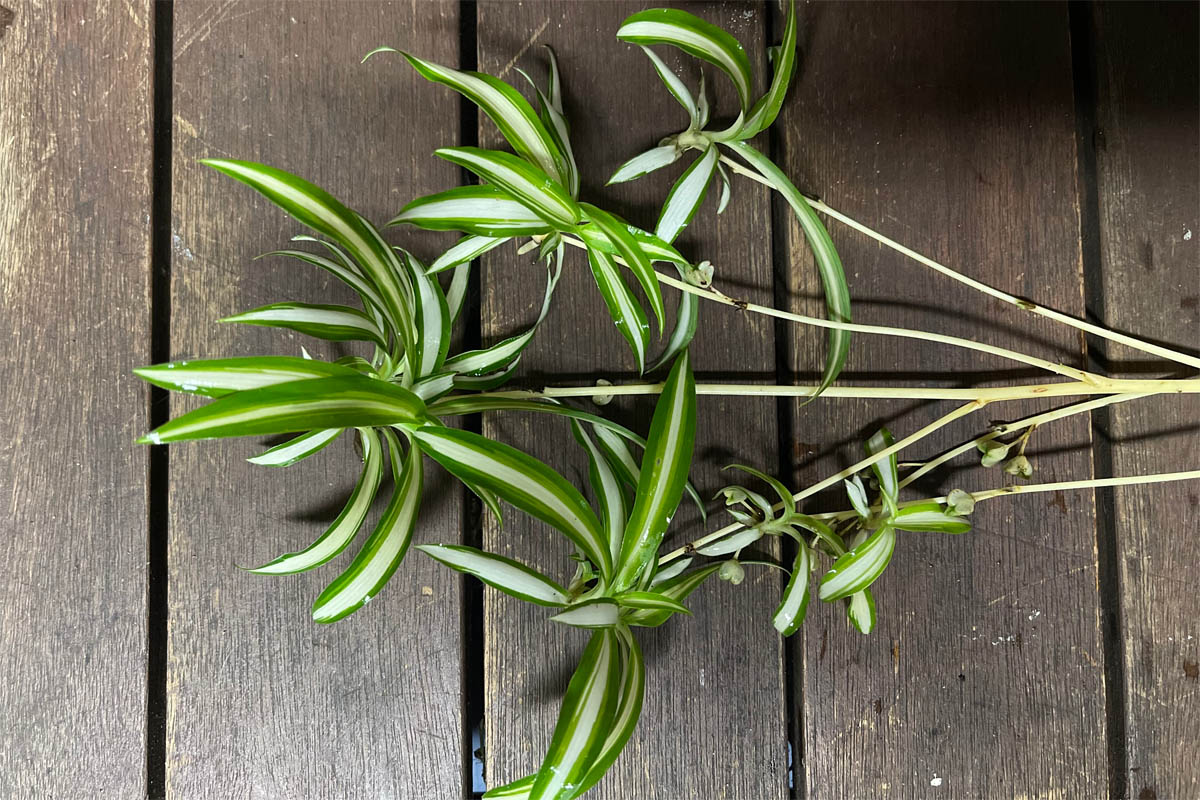
Do you ever look at your thriving spider plant, with all its little plantlets dangling like green chandeliers, and wish you had even more of them? You are not alone, you know. Lots of plant lovers feel that way, and there is a very simple way to make that wish come true. It is called propagating spider plants, and it is a truly rewarding part of having these popular houseplants.
Spider plants, with their arching leaves and tiny "babies" (plantlets), are a real joy to have around. They clean the air, they look nice, and they are, frankly, pretty forgiving if you are just starting out with plants. Getting more of them from one parent plant is, in a way, like getting something very useful without any extra cost, a bit like how you can get something that helps you get more done, more or less.
This whole process of propagating spider plants is, you might say, quite simple and very safe for the parent plant when you know the steps. It is a quick way to grow your plant collection, or perhaps share some green happiness with friends and family. So, let's look at how you can do this yourself, easily and with good results.
Table of Contents
- Why Propagate Spider Plants?
- What You'll Need for Propagation
- When is the Best Time to Propagate?
- Method One: Water Propagation
- Method Two: Soil Propagation
- Caring for Your New Spider Plant Babies
- Troubleshooting Common Propagation Issues
- Frequently Asked Questions About Propagating Spider Plants
- Conclusion: Grow Your Green Family
Why Propagate Spider Plants?
There are many good reasons to start propagating spider plants. For one thing, it is a very cost-effective way to get more plants. Instead of buying new ones, you can just make them from the plants you already have. This is a big plus for anyone who likes to keep their plant hobby affordable, you know.
Another reason is the sheer joy of watching something new grow. Taking a small plantlet and helping it become a full-sized plant is a truly satisfying experience. It is a bit like seeing a project through from start to finish, and it offers a feeling of success, you might say.
Also, spider plants are known for being good at cleaning the air in your home. Having more of them means more air purification, which is a nice benefit for your living space. Plus, they make wonderful gifts for friends and family. A homemade plant gift shows you put thought and care into it, and it is something that can bring joy for a long time.
What You'll Need for Propagation
Gathering your supplies before you start makes the whole process smoother. You really do not need much, which is another reason why propagating spider plants is so popular. It is, in some respects, very accessible.
You will need a sharp pair of scissors or a small, clean knife. Making sure your tools are clean is important to keep any unwanted things from getting into your plant. You might clean them with rubbing alcohol before you begin, which is a good practice.
For water propagation, you will just need a small glass or jar. Something clear works well so you can see the roots growing. For soil propagation, you will want small pots with drainage holes and some fresh potting mix. A general-purpose potting mix that drains well is usually fine for these plants.
When is the Best Time to Propagate?
Spider plants can be propagated almost any time of year, but they tend to do best during their active growing season. This is typically in the spring or summer months, when the days are longer and the plant is naturally putting out new growth. So, if you can, aim for that time.
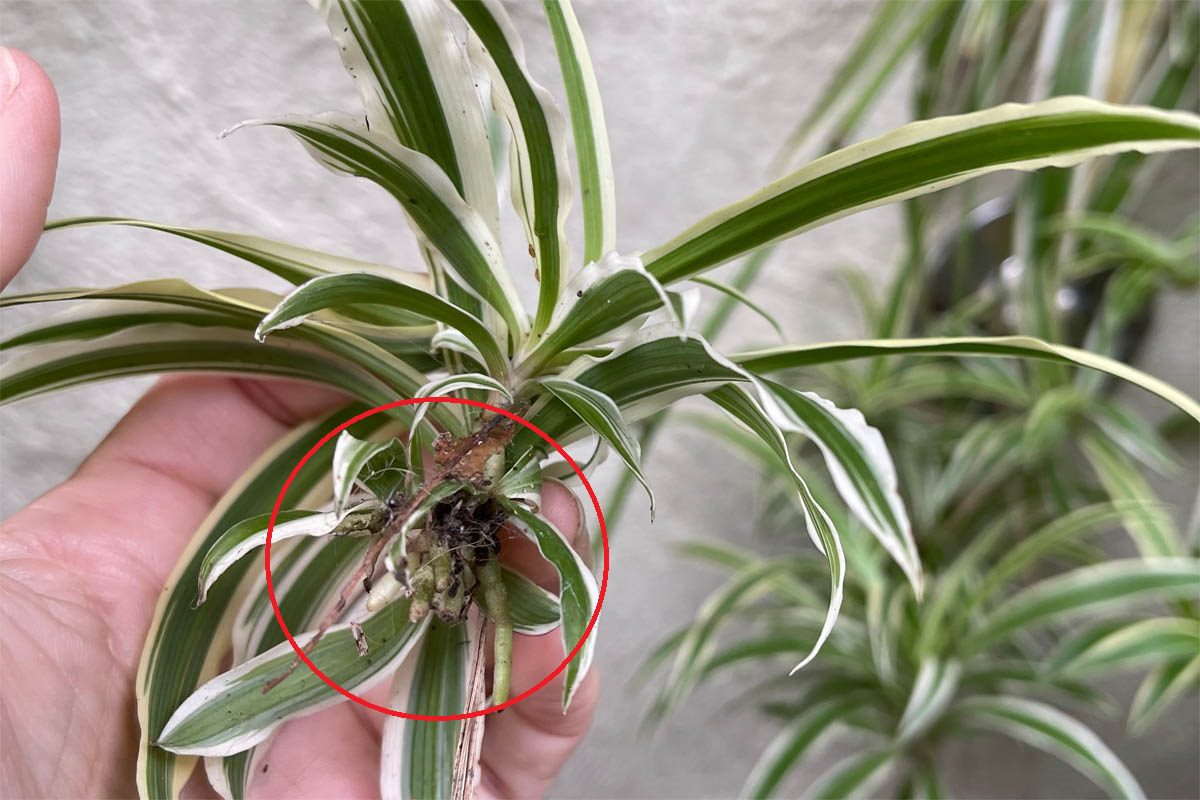
You will want to choose plantlets that are a good size. Look for those that are at least a couple of inches across and have started to develop tiny bumps or nubs at their base. These little bumps are where the roots will start to grow, so they are a good sign of readiness. Some plantlets might even have a few small roots already showing, which is, honestly, an even better sign.
Avoid taking plantlets from a parent plant that looks stressed or unhealthy. A happy, vigorous parent plant will give you the best chance for successful propagation. It is all about giving your new plants a strong start, you know.
Method One: Water Propagation
Water propagation is a very popular way to start new spider plants. It is quite simple, and it lets you watch the roots grow, which many people find very satisfying. This method is, arguably, the most straightforward for beginners.
It is also a rather clean method, as you are not dealing with soil right away. You just need a glass of water and a bit of patience. The plantlets seem to take to it quite easily, more or less, and it is a gentle start for them.
Steps for Water Propagation
First, carefully cut a plantlet from the main plant. Make your cut close to the stem that connects the plantlet to the parent. Try to get as much of the plantlet's base as possible without harming the parent plant. You want to make a clean cut, just a little below the plantlet itself.
Next, remove any small, dried-up leaves from the very bottom of the plantlet. You want the base of the plantlet to be clear so it can sit in the water without any leaves rotting. This helps keep the water clean, too.
Place the plantlet into a small glass or jar filled with fresh water. Make sure only the very bottom of the plantlet is submerged, not the leaves. You want the water to cover where the roots will come out, but not the foliage. This is pretty important for success.
Caring for Water Cuttings
Place your glass with the plantlet in a spot that gets bright, indirect light. Avoid direct sun, as this can be too harsh for the young plantlet and might cause the water to heat up too much. A bright room, away from a window that gets direct sun, is usually perfect.
Change the water every few days, or at least once a week. Fresh water provides oxygen and helps prevent algae from growing, which can be bad for the developing roots. This simple step is, in fact, key to healthy root growth.
You should start to see tiny roots appearing within a week or two. Let the roots grow to about an inch or two long before you think about planting them in soil. This usually takes about three to four weeks. Once they have a good root system, they are ready for their new home.
Method Two: Soil Propagation
Propagating spider plants directly into soil is another effective method, and some people prefer it because it means less disturbance for the plant later on. It is, you know, a way to skip the water stage altogether.
This method can be a bit more hands-off once the plantlet is in the soil, as you do not need to change water regularly. It is, in a way, a more permanent setup from the start. It can also lead to a very stable plant from the get-go.
Steps for Soil Propagation
Just like with water propagation, start by cutting a healthy plantlet from the parent plant. Again, make a clean cut close to the stem that connects it. Remove any lower, dried-up leaves from the base of the plantlet so the bottom is clear for planting.
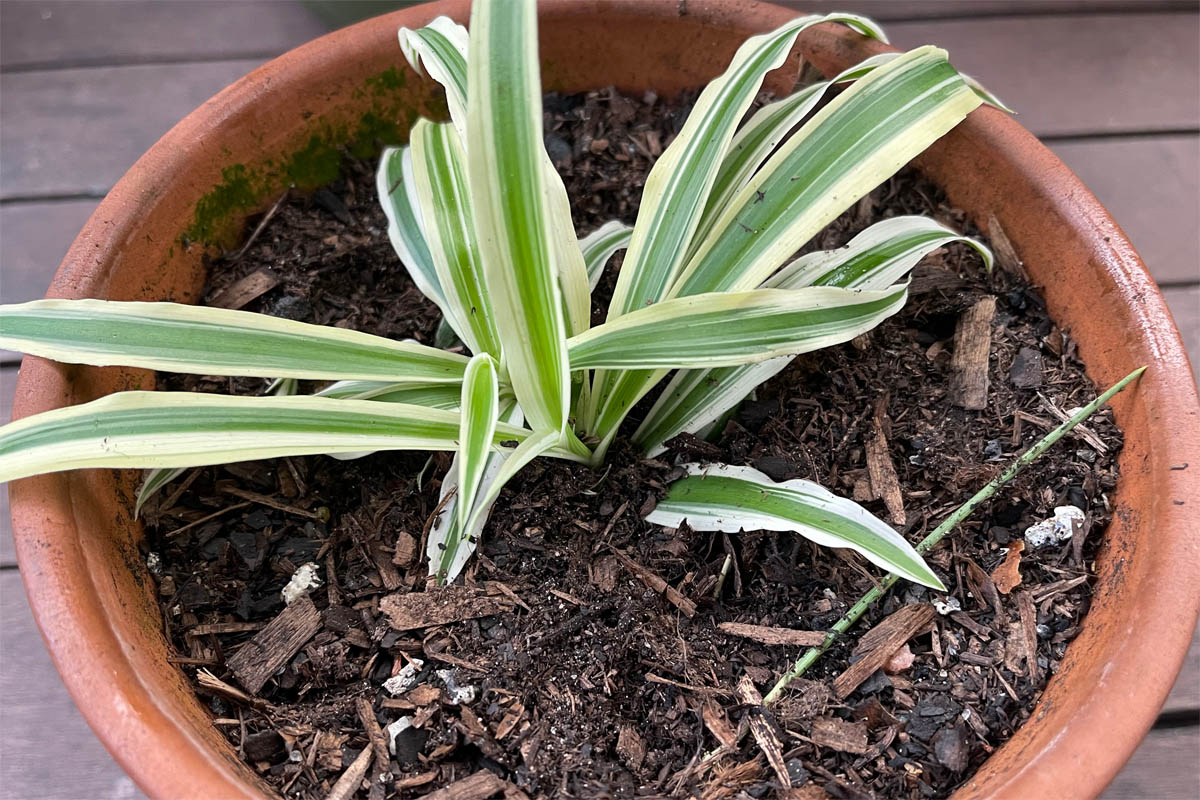
Fill a small pot, about 4-6 inches across, with fresh, well-draining potting mix. Make a small hole in the center of the soil with your finger or a pencil. This is where your plantlet will go. You want the soil to be slightly moist before you put the plantlet in, so you might water it just a little.
Gently place the base of the plantlet into the hole, making sure the part where the roots will form is covered by soil. Lightly firm the soil around the base to keep the plantlet upright. Do not bury the leaves, just the very bottom of the plantlet. This helps it stand up, pretty much.
Caring for Soil Cuttings
After planting, give the soil a gentle watering. You want the soil to be moist, but not soaking wet. Overwatering can lead to problems, so be careful. The plantlet needs moisture to encourage root growth, but too much is not good.
Place the potted plantlet in a spot that gets bright, indirect light. Just like with water propagation, direct sun can be too intense. A consistent temperature is also helpful for new growth. This helps the plant settle in, so to speak.
Keep the soil consistently moist, but allow the very top layer to dry out slightly between waterings. You can check for root development by gently tugging on the plantlet after a few weeks. If you feel some resistance, it means roots have formed and are anchoring the plant in the soil. This is, you know, a good sign of progress.
Caring for Your New Spider Plant Babies
Once your new spider plant babies have established roots, whether in water or soil, they will need ongoing care to grow into strong, independent plants. They are, in a way, ready for their own journey now. This stage is about nurturing them.
If you started your plantlets in water, they will need to be moved to soil once their roots are a few inches long. Choose a small pot with good drainage and use a standard potting mix. Gently transfer the plantlet, trying not to disturb the new roots too much. Water it well after planting.
For all new spider plants, keep them in a spot with bright, indirect light. Water them when the top inch or two of soil feels dry to the touch. Spider plants like to dry out a bit between waterings, so do not keep them constantly wet. Overwatering is a common issue for many houseplants, you see.
You can start feeding your new plants with a diluted liquid houseplant fertilizer after they have been in their new pots for about a month or two. Use half the strength recommended on the fertilizer package, and only feed them during their active growing season. This helps them get the nutrients they need to grow big and strong.
As your plant grows, it will eventually need a bigger pot. You will know it is time to repot when you see roots growing out of the drainage holes or if the plant looks too big for its current pot. This is a natural part of a plant's life cycle, after all.
Troubleshooting Common Propagation Issues
Sometimes, even with the best intentions, things do not go exactly as planned when propagating spider plants. But do not worry, many common issues have simple solutions. It is, quite literally, part of the learning process.
If your plantlet is not rooting in water, first check the water. Is it fresh? Is it clean? Change the water more often. Also, make sure the plantlet is getting enough light, but not direct sun. Sometimes, it just takes a little more time, too. Some plantlets are just a little slower than others, that is all.
If your plantlet looks droopy or yellowing, it could be getting too much water, or not enough. Feel the soil. If it is soggy, let it dry out more between waterings. If it is bone dry, give it a good drink. Yellowing can also be a sign of too much direct sun, so consider moving it to a shadier spot.
Another thing to check is the temperature. Spider plants like consistent, warm temperatures. If the room is too cold or experiences big temperature swings, it can stress the plantlet. A stable environment helps a lot, you know, for growth.
Patience is, honestly, a big part of successful propagation. Not every plantlet will make it, and that is okay. Keep trying, and you will get the hang of it. It is a bit like learning any new skill; practice makes it easier, more or less.
Frequently Asked Questions About Propagating Spider Plants
People often have similar questions when they start propagating spider plants. Here are some of the most common ones, with some helpful answers.
Can you propagate spider plants without roots?
Yes, you certainly can. Spider plant plantlets do not need to have roots already formed to be propagated. The little bumps or nubs at their base are where the roots will emerge, especially when placed in water or moist soil. It is, in a way, the starting point for their root system.
How long does it take for spider plant babies to root in water?
Typically, you will start to see roots appearing within one to two weeks when propagating spider plant babies in water. For the roots to grow long enough to be ready for potting, it usually takes about three to four weeks. Sometimes it can be a bit faster, sometimes a little slower, depending on the conditions, you know.
Do you cut the stem off spider plant babies?
Yes, you do. When you are ready to propagate, you cut the stem that connects the plantlet to the main parent plant. Make a clean cut as close to the plantlet's base as possible without harming the plantlet itself. This gives the plantlet a clean start to grow its own roots, you see.
Conclusion: Grow Your Green Family
Propagating spider plants is a truly simple and rewarding activity for any plant enthusiast. It is a way to expand your green collection without spending extra money, and it lets you share the joy of plants with others. The process is quite straightforward, whether you choose to root them in water or directly in soil. It is, honestly, a very accessible way to grow your plant family.
Just like how modern tools are designed to be simple, secure, and fast, propagating these plants can be a very smooth process when you follow a few basic steps. You can, in a way, get more done with your plants, seeing them multiply and thrive. This method is also very customizable to your preference, whether you like to watch roots grow in water or prefer the directness of soil.
So, go ahead and give it a try! You might find that you have a knack for it, and soon your home will be full of vibrant, air-cleaning spider plants, all from one happy parent. It is a wonderful way to connect with nature right in your own space. Learn more about plant care on our site, and for more tips on creating a thriving indoor garden, link to this page indoor-garden-tips. For general plant health information, you can always check reliable sources like Gardening Know How.
Detail Author:
- Name : Emelie Hirthe
- Username : michale47
- Email : pascale.abernathy@hotmail.com
- Birthdate : 1992-09-10
- Address : 94060 Rath Stravenue Apt. 286 Fredrickberg, PA 17832
- Phone : +1-813-743-2110
- Company : Considine Group
- Job : Urban Planner
- Bio : Fuga inventore labore reiciendis consequatur nihil laudantium in. Enim est ut est neque qui aspernatur.
Socials
twitter:
- url : https://twitter.com/kari_herzog
- username : kari_herzog
- bio : Quo ipsam libero eaque consequatur qui aut vel. Quam in omnis numquam cumque. Dolor doloribus repudiandae est odit.
- followers : 5093
- following : 1201
facebook:
- url : https://facebook.com/kari_herzog
- username : kari_herzog
- bio : Magnam magnam quis qui non eum.
- followers : 3248
- following : 1288
linkedin:
- url : https://linkedin.com/in/kari_xx
- username : kari_xx
- bio : Magnam illum veniam quis omnis.
- followers : 6544
- following : 1954
